이번에는 저번에 했던거에서 좌표(경도, 위도) 값을 통해서 출발지와 도착지를 작성하면 어떻게 찾아갈 수 있는 지 값을 주는 Direction 5 API를 사용해보려고 합니다.
프론트 전체 코드
<template>
  <div>
    <input v-model="departure" placeholder="출발지 입력" />
    <input v-model="destination" placeholder="도착지 입력" />
    <button @click="searchRoute">경로 검색</button>
    <div id="map" ref="mapRef" style="width:100%;height:500px;"></div>

  <div v-if="isDataLoaded">

  <h3>경로 안내</h3>
  <table border="1" style="width:100%; margin-top: 20px;">
    <thead>
      <tr>
        <th>#</th>
        <th>안내</th>
        <th>거리 (km)</th>
        <th>소요 시간 (분:초)</th>
      </tr>
    </thead>
    <tbody>
      <tr v-for="(guide, index) in directionObject.route.traoptimal[0].guide" :key="index">
        <td>{{ index + 1 }}</td>
        <td>{{ guide.instructions }}</td>
        <td>{{ (guide.distance / 1000).toFixed(2) }}</td>
        <td>
          {{ Math.floor(guide.duration / (1000 * 60)) }}분
          {{ Math.floor((guide.duration / 1000) % 60) }}초
        </td>
      </tr>
    </tbody>
  </table>
  <!-- 전체 경로 정보 테이블 -->
  <h3>전체 경로 정보</h3>
     <table  border="1" style="width:100%; margin-top: 20px;">
        <thead>
          <tr>
            <th>전체 거리 (km)</th>
            <th>전체 시간 (분:초)</th>
            <th>연료 비용 (원)</th>
            <th>택시 요금 (원)</th>
          </tr>
        </thead>
        <tbody>
          <tr>
            <td>{{ (totalDetails.value.totalDistance / 1000).toFixed(2) }} km</td>
            <td>
              {{ Math.floor(totalDetails.value.totalDuration / (1000 * 60)) }}분
              {{ Math.floor((totalDetails.value.totalDuration / 1000) % 60) }}초
            </td>
            <td>{{ totalDetails.value.fuelPrice?.toLocaleString() || 0 }} 원</td>
            <td>{{ totalDetails.value.taxiFare?.toLocaleString() || 0 }} 원</td>
          </tr>
        </tbody>
      </table>
  </div>
</div>
</template>

<script setup>
import { ref, onMounted, watch, nextTick, reactive } from 'vue';
import mapAPI from '@/apis/mapAPI';

const mapRef = ref(null); // 네이버 맵을 불러오기 위한 div 태그 자체를 참조
const departure = ref(''); // 출발지 검색어 양방향
const destination = ref(''); // 도착지 검색어 양방향
const departureCoordinate = ref({}); // 출발지 경도, 위도 좌표
const destinationCoordinate = ref({}); // 도착지 경도, 위도 좌표
let map = null; // 생성된 네이버 지도 객체 저장
const directionObject = ref({
  route: {
    traoptimal: [
      {
        guide: [],
        summary: {
          distance: 0,
          duration: 0,
          fuelPrice: 0,
          taxiFare: 0,
          tollFare: 0,
        },
      },
    ],
  },
}); // Direction API를 통한 전체 값
const guideDetails = ref([]); // 각 가이드 정보 (분기점정보, 지시, 거리, 소요시간)
const totalDetails = reactive({
  totalDistance: 0,
  totalDuration: 0,
  fuelPrice: 0,
  taxiFare: 0,
  tollFare: 0,
}); // 전체 정보 (거리, 소요시간, 유류비, 택시요금, 톨비)
const isDataLoaded = ref(false); // 데이터 로드 상태 추적

const CLIENT_ID = process.env.VUE_APP_CLIENT_ID;

watch(
  () => totalDetails.value,
  (newValue) => {
    console.log("totalDetails 변경됨:", newValue);
    console.log("경로 데이터 전체:", JSON.stringify(totalDetails.value, null, 2))
  }
);

watch(
  () => isDataLoaded.value,
  (newValue) => {
    console.log("isDataLoaded 상태:", newValue);
  }
);

onMounted(() => {
  if (window.naver && window.naver.maps) {
    initMap();
  } else {
    const script = document.createElement('script');
    script.src = `https://oapi.map.naver.com/openapi/v3/maps.js?ncpClientId=${CLIENT_ID}&submodules=geocoder`;
    script.onload = initMap;
    document.head.appendChild(script);
  }
});


function initMap() {
  const mapOptions = {
    center: new window.naver.maps.LatLng(37.519259, 127.034426),
    zoom: 17
  };

  map = new window.naver.maps.Map(mapRef.value, mapOptions);
}

// 출발지와 도착지 작성 및 백엔드 파라미터 전달 함수 호출
async function searchRoute() {
  if (!departure.value || !destination.value) {
    alert('출발지와 도착지를 모두 입력해주세요.');
    return;
  }

  await searchAddress(departure.value, 'departure');
  await searchAddress(destination.value, 'destination');
}


// 백엔드 호출 및 데이터 좌표 값 저장 함수 호출
async function searchAddress (query, type){
  try{
    console.log("쿼리값 출력" + query);
    const response = await mapAPI.geocodingData(query);
    const data = response.data;
    console.log( `${type} 좌표: `, data );

    if (type === 'departure') {
      // 출발지 데이터 처리 및 저장
      await storeDepartureData(data);
    } else if (type === 'destination') {
      // 도착지 데이터 처리 및 저장
      await storeDestinationData(data);
    }

    if ( isValidCoordinate(departureCoordinate.value) && isValidCoordinate(destinationCoordinate.value) ){
      // 거리 측정 함수 호출
      await getDirection(departureCoordinate.value, destinationCoordinate.value);
    } else {
      console.log("유효한 출발지 또는 도착지 좌표가 없습니다.");
    }

  } catch (error) {
    console.log(error);
  }

}

//  거리 측정 백엔드 호출 함수
async function getDirection (departureCoordinate, destinationCoordinate){
  try{
    isDataLoaded.value = false; // 데이터 로딩 시작
    const response = await mapAPI.getDirectionData(departureCoordinate, destinationCoordinate);
    directionObject.value = response.data;

    // 데이터가 제대로 로드되었는지 확인 후 상태 변경
    if (directionObject.value.route.traoptimal.length) {
      console.log("경로 데이터 로드 완료:" +  directionObject.value);
      await extraRouteDetails(directionObject.value);
      console.log("전체 경로 거리: " + totalDetails.value.totalDistance);
      console.log("전체 경로 시간: " + totalDetails.value.totalDuration);

      await nextTick();
      isDataLoaded.value = true;

    } else {
      console.log("경로 데이터가 비어 있습니다.");
      directionObject.value = { route: { traoptimal: [] } };

    }

    // console.log("경로 데이터 전체:", JSON.stringify(directionObject.value, null, 2));

    // 정보 가공 함수 호출
    drawPolyline();

  } catch(error) {
    console.log('경로 탐색 중 오류 발생', error);
  }

}

// 정보 가공 함수
async function extraRouteDetails(directionObject){
  const route = directionObject.route.traoptimal[0]; // 최적 경로
  const summary = directionObject.route.traoptimal[0].summary; // 경로 요약 정보

  // 1. 분기점 안내 정보 추출
  guideDetails.value = route.guide.map((item) => ({
    type: item.type,
    instructions: item.instructions,
    distance: item.distance,
    duration: item.duration,
  }));

  // 2. 전체 정보 추출
  totalDetails.value = {
    totalDistance: summary.distance || 0, // 전체 거리 (m)
    totalDuration: summary.duration || 0, // 전체 소요 시간 (ms)
    fuelPrice: summary.fuelPrice || 0, // 유류비
    taxiFare: summary.taxiFare || 0, // 택시 요금
    tollFare: summary.tollFare || 0, // 톨비
  };

  console.log("분기점 안내 정보: " + guideDetails.value[0].type);
  console.log("전체 경로 거리: " + totalDetails.value.totalDistance);
  console.log("전체 경로 시간: " + totalDetails.value.totalDuration);
console.log("totalDetails 값 설정:", totalDetails.value);
isDataLoaded.value = true;
console.log("isDataLoaded 상태:", isDataLoaded.value);

}


// 좌표 값 확인 함수
function isValidCoordinate(coord) {
  return coord && coord.x !== undefined && coord.y !== undefined;
}

// 출발 데이터 좌표 저장 함수
function storeDepartureData(data) {
  console.log("출발지 data값" + data.x + " : " + data.y);
  departureCoordinate.value = {
    x: data.x,
    y: data.y
  };
  console.log("출발지 데이터 저장값:" + departureCoordinate.value.x + " : "+ departureCoordinate.value.y);
}

// 도착 데이터 좌표 저장 함수
function storeDestinationData(data) {
  console.log("도착지 data값" + data.x + " : " + data.y);
  destinationCoordinate.value = {
    x: data.x,
    y: data.y
  };
  console.log("도착지 데이터 저장값:" + destinationCoordinate.value.x +" : " +  destinationCoordinate.value.y);
}


}

</script>
코드를 하나의 파일에 작성하다 보니 코드량이 엄청나게 늘어 났다.
완성 이후에 파일을 분리해서 불러오는 방식으로 진행을 하려고 해서 일단 프로젝트 진행 중에는 파일을 나누지 않을 생각이다.
많은 것이 추가되어서 순서대로 설명을 해보려고 한다.
1. 이전에 Geocoding을 통해서 좌표 ( 경도, 위도)를 백엔드로 부터 받아오는 것까지 마무리 하였다.
그 뒤에 이 값들을 통해서 다시 백엔드로 경도와 위도를 전달하고 Direction 5 API를 호출하는 것까지 진행을 하였는데
getDirection이라는 함수를 통해서 백엔드로 값을 전달하였다. 호출한 함수는 따로 만들어진 파일에서 함수를 실행
import axios from "axios";

function geocodingData(query) {
    return axios.get(`/geocode/${query}`);
}

function getDirectionData(departureCoordinate, destinationCoordinate){
    return axios.get('/driving', {
        params: {
          departureX: departureCoordinate.x,
          departureY: departureCoordinate.y,
          destinationX: destinationCoordinate.x,
          destinationY: destinationCoordinate.y
        }
    });
}

export default {
    geocodingData,
    getDirectionData,

}
들어온 값인 출발, 도착의 값을 x 와 y로 나누어서 경도, 위도를 백엔드로 파람으로 전달을 하였다.
나는 여기서 또 base.url을 사용해서 모든 요청을 나의 백엔드 port로 맞추어서 값을 전달하였다.
import axios from "axios";

//기본 경로 설정
axios.defaults.baseURL = "http://localhost:8080/api";
2. 값을 받은 백엔드 서버는 네이버 클라우드 플랫폼으로 값을 넘겨 다시 값을 받아온다.
백엔드 전체 코드
package com.example.maptest.controller;

import org.springframework.beans.factory.annotation.Value;
import org.springframework.http.HttpEntity;
import org.springframework.http.HttpHeaders;
import org.springframework.http.HttpMethod;
import org.springframework.http.ResponseEntity;
import org.springframework.web.bind.annotation.GetMapping;
import org.springframework.web.bind.annotation.RequestParam;
import org.springframework.web.bind.annotation.RestController;
import org.springframework.web.client.RestTemplate;
import org.springframework.web.util.UriComponentsBuilder;

@RestController
public class DirectionController {

	@Value("${naver.api.client-id}")
	String clientId;

	@Value("${naver.api.client-secret}")
	String clientSecret;

    @GetMapping("/api/driving")
    public ResponseEntity<String> getDriving(
    		 @RequestParam("departureX") double departureX,
    	     @RequestParam("departureY") double departureY,
    	     @RequestParam("destinationX") double destinationX,
    	     @RequestParam("destinationY") double destinationY
        ) {

    	try {
    		System.out.println("출발 X : " + departureX);
    		System.out.println("출발 Y : " + departureY);
    		System.out.println("도착 X : " + destinationX);
    		System.out.println("도착 Y : " + destinationY);


    		RestTemplate restTemplate = new RestTemplate();
    		String url = UriComponentsBuilder.fromHttpUrl("https://naveropenapi.apigw.ntruss.com/map-direction/v1/driving")
                    .queryParam("start", String.format("%f,%f", departureX, departureY))
                    .queryParam("goal", String.format("%f,%f", destinationX, destinationY))
                    .build()
                    .toUriString();

            System.out.println("생성된 URI: " + url);

    		HttpHeaders headers = new HttpHeaders();
    		headers.set("X-NCP-APIGW-API-KEY-ID", clientId);
    		headers.set("X-NCP-APIGW-API-KEY", clientSecret);
    		headers.set("Content-Type", "application/json");

    		HttpEntity<String> entity = new HttpEntity<>("parameters", headers);

    		ResponseEntity<String> response = restTemplate.exchange(url, HttpMethod.GET, entity, String.class);

    		System.out.println("데이터 확인: " + response.getBody());

    		return ResponseEntity.ok(response.getBody());

		} catch (Exception e) {
			System.out.println("에러 확인" + e);
			return ResponseEntity.status(500).body("길찾기 요청 실패 : " + e.getMessage() );
		}


    }
}
이전에는 id와 secret을 하드 코딩하였는데 현재는 properties-naver에 추가하였고, 그 값을 다시 .gitignore에 등록하여
깃허브에 등록되지 않도록 설정하였다.
여기서는 네이버에서 받은 모든 값을 전달하였다.
3. 백엔드 서버에서 값을 받은 프론트에서 값을 가공을 해주었다.
getDirection에서 가공하는 함수를 호출하고 있는데
// 정보 가공 함수
async function extraRouteDetails(directionObject){
  const route = directionObject.route.traoptimal[0]; // 최적 경로
  const summary = directionObject.route.traoptimal[0].summary; // 경로 요약 정보

  // 1. 분기점 안내 정보 추출
  guideDetails.value = route.guide.map((item) => ({
    type: item.type,
    instructions: item.instructions,
    distance: item.distance,
    duration: item.duration,
  }));

  // 2. 전체 정보 추출
  totalDetails.value = {
    totalDistance: summary.distance || 0, // 전체 거리 (m)
    totalDuration: summary.duration || 0, // 전체 소요 시간 (ms)
    fuelPrice: summary.fuelPrice || 0, // 유류비
    taxiFare: summary.taxiFare || 0, // 택시 요금
    tollFare: summary.tollFare || 0, // 톨비
  };

  console.log("분기점 안내 정보: " + guideDetails.value[0].type);
  console.log("전체 경로 거리: " + totalDetails.value.totalDistance);
  console.log("전체 경로 시간: " + totalDetails.value.totalDuration);
console.log("totalDetails 값 설정:", totalDetails.value);
isDataLoaded.value = true;
console.log("isDataLoaded 상태:", isDataLoaded.value);

}
totalDetails와 guideDetails는 미리 ref로 설정하여 값을 동적으로 넣어주었다.
근데여기서 문제가 생기게 되는데 값을 동적으로 저장한 후에 DOM이 변경되고 나서 저장된 값들을 호출을 해야하는데
자꾸 log의 경우에는 출력이 잘되는데 값이 없다는 뜻인 undefined 에러가 발생하였다.
- undefined는 javaScript가 초기화 될때 저장되는 값이다.
그래서 해결 방법을 찾아 보다 await nextTick()이라는 것을 찾았는데 이 함수는 값이 동적으로 저장되고나서 다시 DOM이 업데이트 되는 것을 기다리는 함수였다.
근데 나의 경우 이것을 사용했는데도 실패하였다.......
하지만 다행하게도 reactive라는 녀석을 통해서 문제가 해결되었다.
reactive와 ref는 비슷하게 사용되지만 차이가 있다.
- ref와 reactive의 차이
Ref Reactive
| 기본 용도 | 단일 값(기본형 데이터)을 반응형으로 만듭니다. | 객체 또는 배열과 같은 복합 데이터를 반응형으로 만듭니다. |
| 작동 방식 | 값이 내부적으로 .value 속성에 저장됩니다. | 객체의 모든 속성과 중첩된 속성들이 반응형으로 변환됩니다. |
| 사용 방식 | 단순 데이터 값이나 DOM 요소의 참조에 적합. | 복합 데이터 구조(객체, 배열 등)의 관리에 적합. |
| DOM 업데이트 | .value 속성이 변경될 때 반응형 업데이트가 발생합니다. | 객체 속성이 변경될 때 반응형 업데이트가 발생합니다. |
| Proxy 적용 여부 | Proxy를 사용하지 않고 단일 값으로 처리. | Proxy를 사용하여 객체 전체를 감시. |
| 사용 예 | 숫자, 문자열 등 기본값 관리, DOM 요소 참조. | 데이터베이스 모델이나 복잡한 상태 관리. |
왜 reactive를 사용하여 문제가 해결되었나요?
에러 발생 이유 (ref 사용 시)
- DOM 업데이트 타이밍 문제:
- ref를 사용하는 경우, 데이터가 변경되어도 .value를 사용하지 않으면 Vue는 변경 사항을 감지하지 못합니다.
- DOM 업데이트 전에 데이터를 접근하려고 하면 에러가 발생할 수 있습니다.
- 객체 관리의 복잡성:
- ref로 객체를 관리하면, 객체의 각 속성에 접근할 때마다 .value를 명시적으로 사용해야 합니다.
- 특정 상황에서 Vue가 객체 내부 변경 사항을 감지하지 못할 수 있습니다.
reactive로 해결된 이유
- Proxy로 객체 전체 감지:
- reactive는 객체의 모든 속성과 중첩된 속성까지 감지합니다.
- DOM 업데이트와 데이터 동기화가 자연스럽게 이루어집니다.
- 직접 속성 접근:
- reactive를 사용하면 객체 속성에 직접 접근할 수 있어 코드가 간결해집니다.
- .value 없이 바로 속성 변경이 가능하므로, 에러 발생 가능성이 줄어듭니다.
많은 내용이 있지만 요약하자면 reactive는 부 속성까지 감지를 하고 있는것이고, ref는 .value를 사용해서 내부를 확인할 수 있지만 특수한 경우에는 내부 변경을 확인하지 못한다고 한다.
특수한 경우는 확인을 못했으니... 따로 찾아보자
이런 이유로 reactive를 사용해 문제를 해결하였다.
4. 값을 가공하고 값을 뿌려주는 것까지 완료를 하였다.
그려지는 화면을 보면
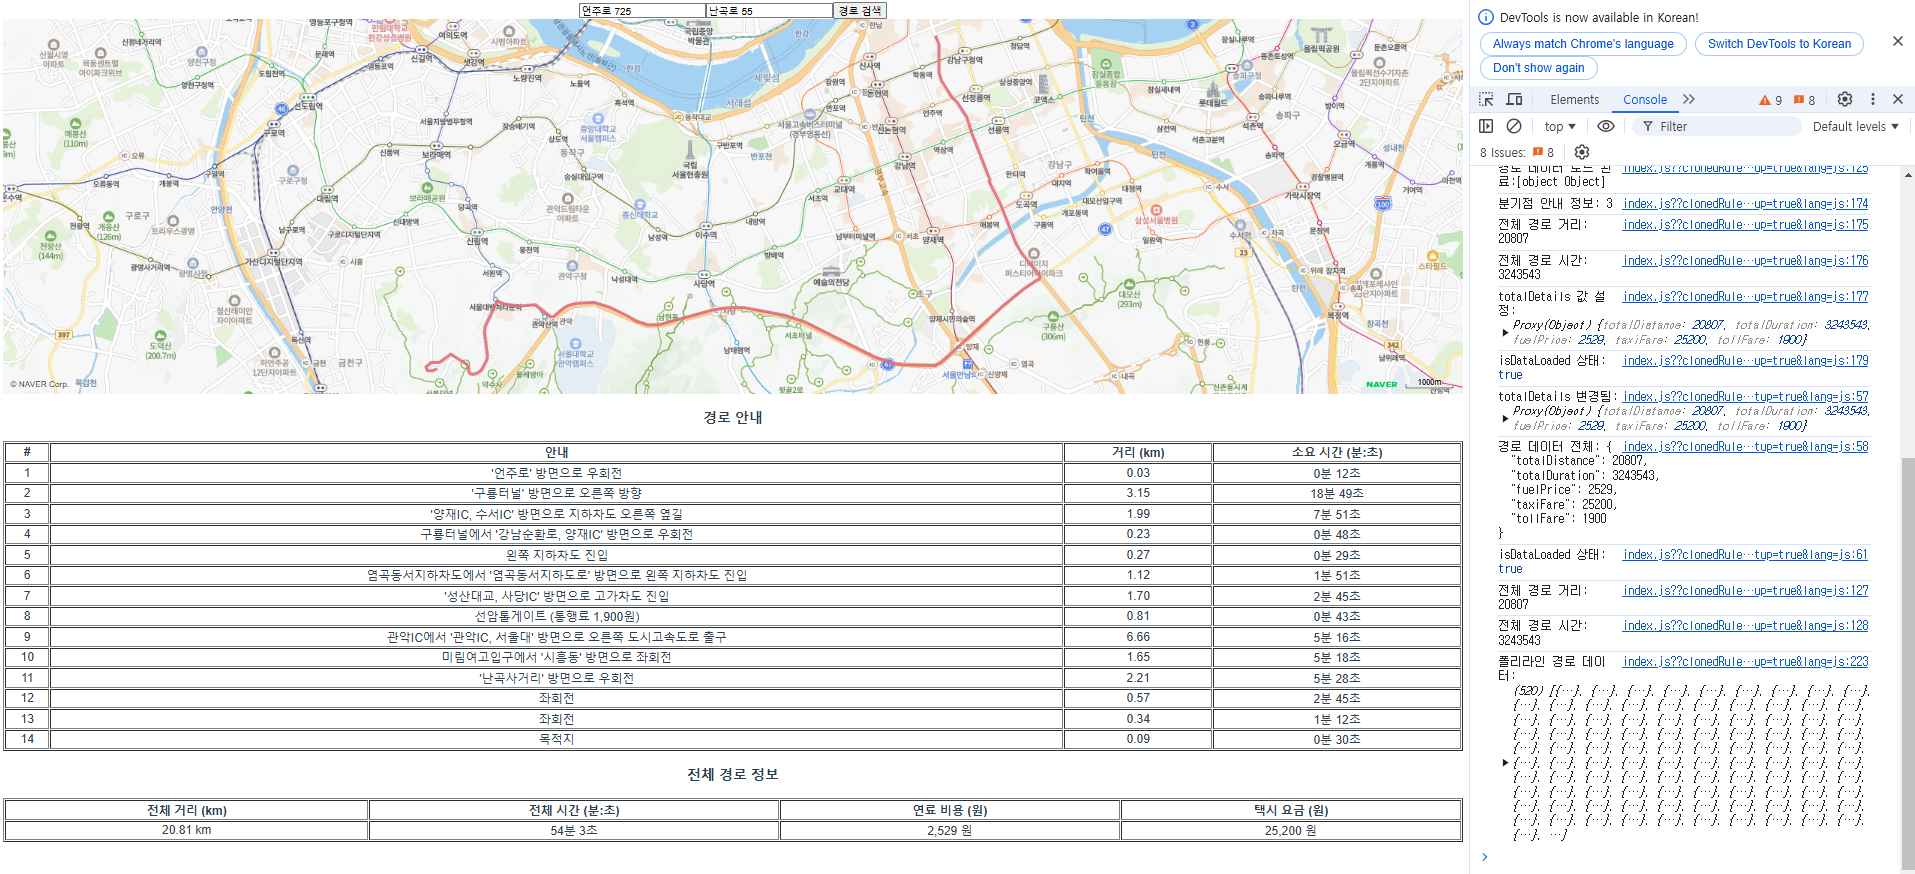
경로 안내와 거리, 소요시간, 전체 경로의 정보까지 잘 확인이 되고 있다.
5. 그리고 log 값 확인을 위한 팁
console.log("경로 데이터 로드 완료:" + directionObject.value);이런식으로 값을 출력하면 브라우저에서는 [Object object]로 나오는 걸 확인할 수 있다. 하지만 우리가 원하는 건... 이걸 확인하는 게 아닌데...
그래서 출력되는 모든 값을 확인할 수 있는 로그를 찍어야 했는데...
console.log("경로 데이터 전체:", JSON.stringify(directionObject.value, null, 2));JSON.stringify를 포함한 로그를 사용하면 해결된다.
- 동작 방식:
- 객체를 문자열로 변환하여 출력합니다.
- 이 경우, 객체의 현재 상태를 JSON 형태의 문자열로 변환해 출력합니다.
- 문자열로 변환되기 때문에 이후 객체 변경과 상관없이 로그에 찍힌 값은 고정된 상태를 유지합니다.
- 추가 옵션:
- JSON.stringify(obj, null, 2):
- null: 특정 키를 제외하지 않음.
- 2: 출력 시 들여쓰기(indent)를 추가하여 보기 쉽게 만듭니다.
- JSON.stringify(obj, null, 2):
이를 통해서 우리가 원하는 값이 로그에 찍히게 된다.
'네이버 맵스(Naver Maps) API' 카테고리의 다른 글
| Vue.js + Spring 네이버 맵스 사용하기 3 (프론트와 백엔드 연결) (0) | 2025.01.10 |
|---|---|
| Vue.js + Spring 네이버 맵스 사용하기 2 (주소 검색을 통해서 정확한 주소 받아오기) (0) | 2025.01.09 |
| Vue.js + Spring 네이버 맵스 사용하기 1 (기본 네이버 맵스 실행시키기) (0) | 2025.01.09 |

